The Goal
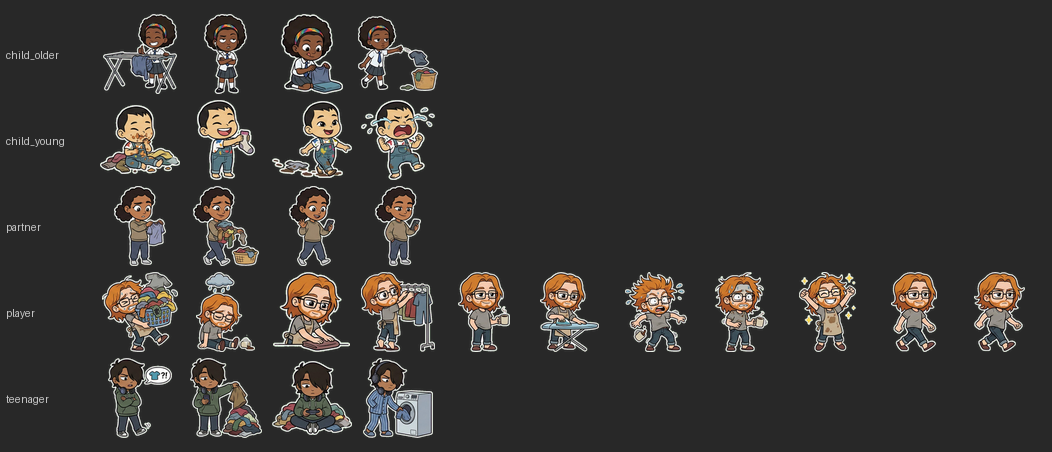
We wanted to create a full set of 2D cartoon sprites for a casual mobile game — clothing items in multiple states (dirty, hanging, drying, folded) and character sprites with various poses. The sprites needed transparent backgrounds so they could be composited over game backgrounds, and clothing sprites needed to be tintable to different colors at runtime.
We used Nano Banana Pro (Google’s Gemini image generation model, accessed through the Gemini web app) for generation, with post-processing in Python.

What We Tried and What Went Wrong
Attempt 1: “Just Make It Transparent”
What we did: Asked for sprites on a transparent background.
What happened: Nano Banana doesn’t output alpha channels. You get a flat RGB image regardless of what you ask for. The model interpreted “transparent background” as a checkerboard pattern, a white background, or a black background — none of which are actual transparency.
Lesson: Gemini image models cannot generate true transparency. You always need a post-processing step.
Attempt 2: Magenta/Black Background + Brightness Threshold Removal
What we did: Generated sprites on a dark/magenta background, then removed dark pixels below a brightness threshold in Python.
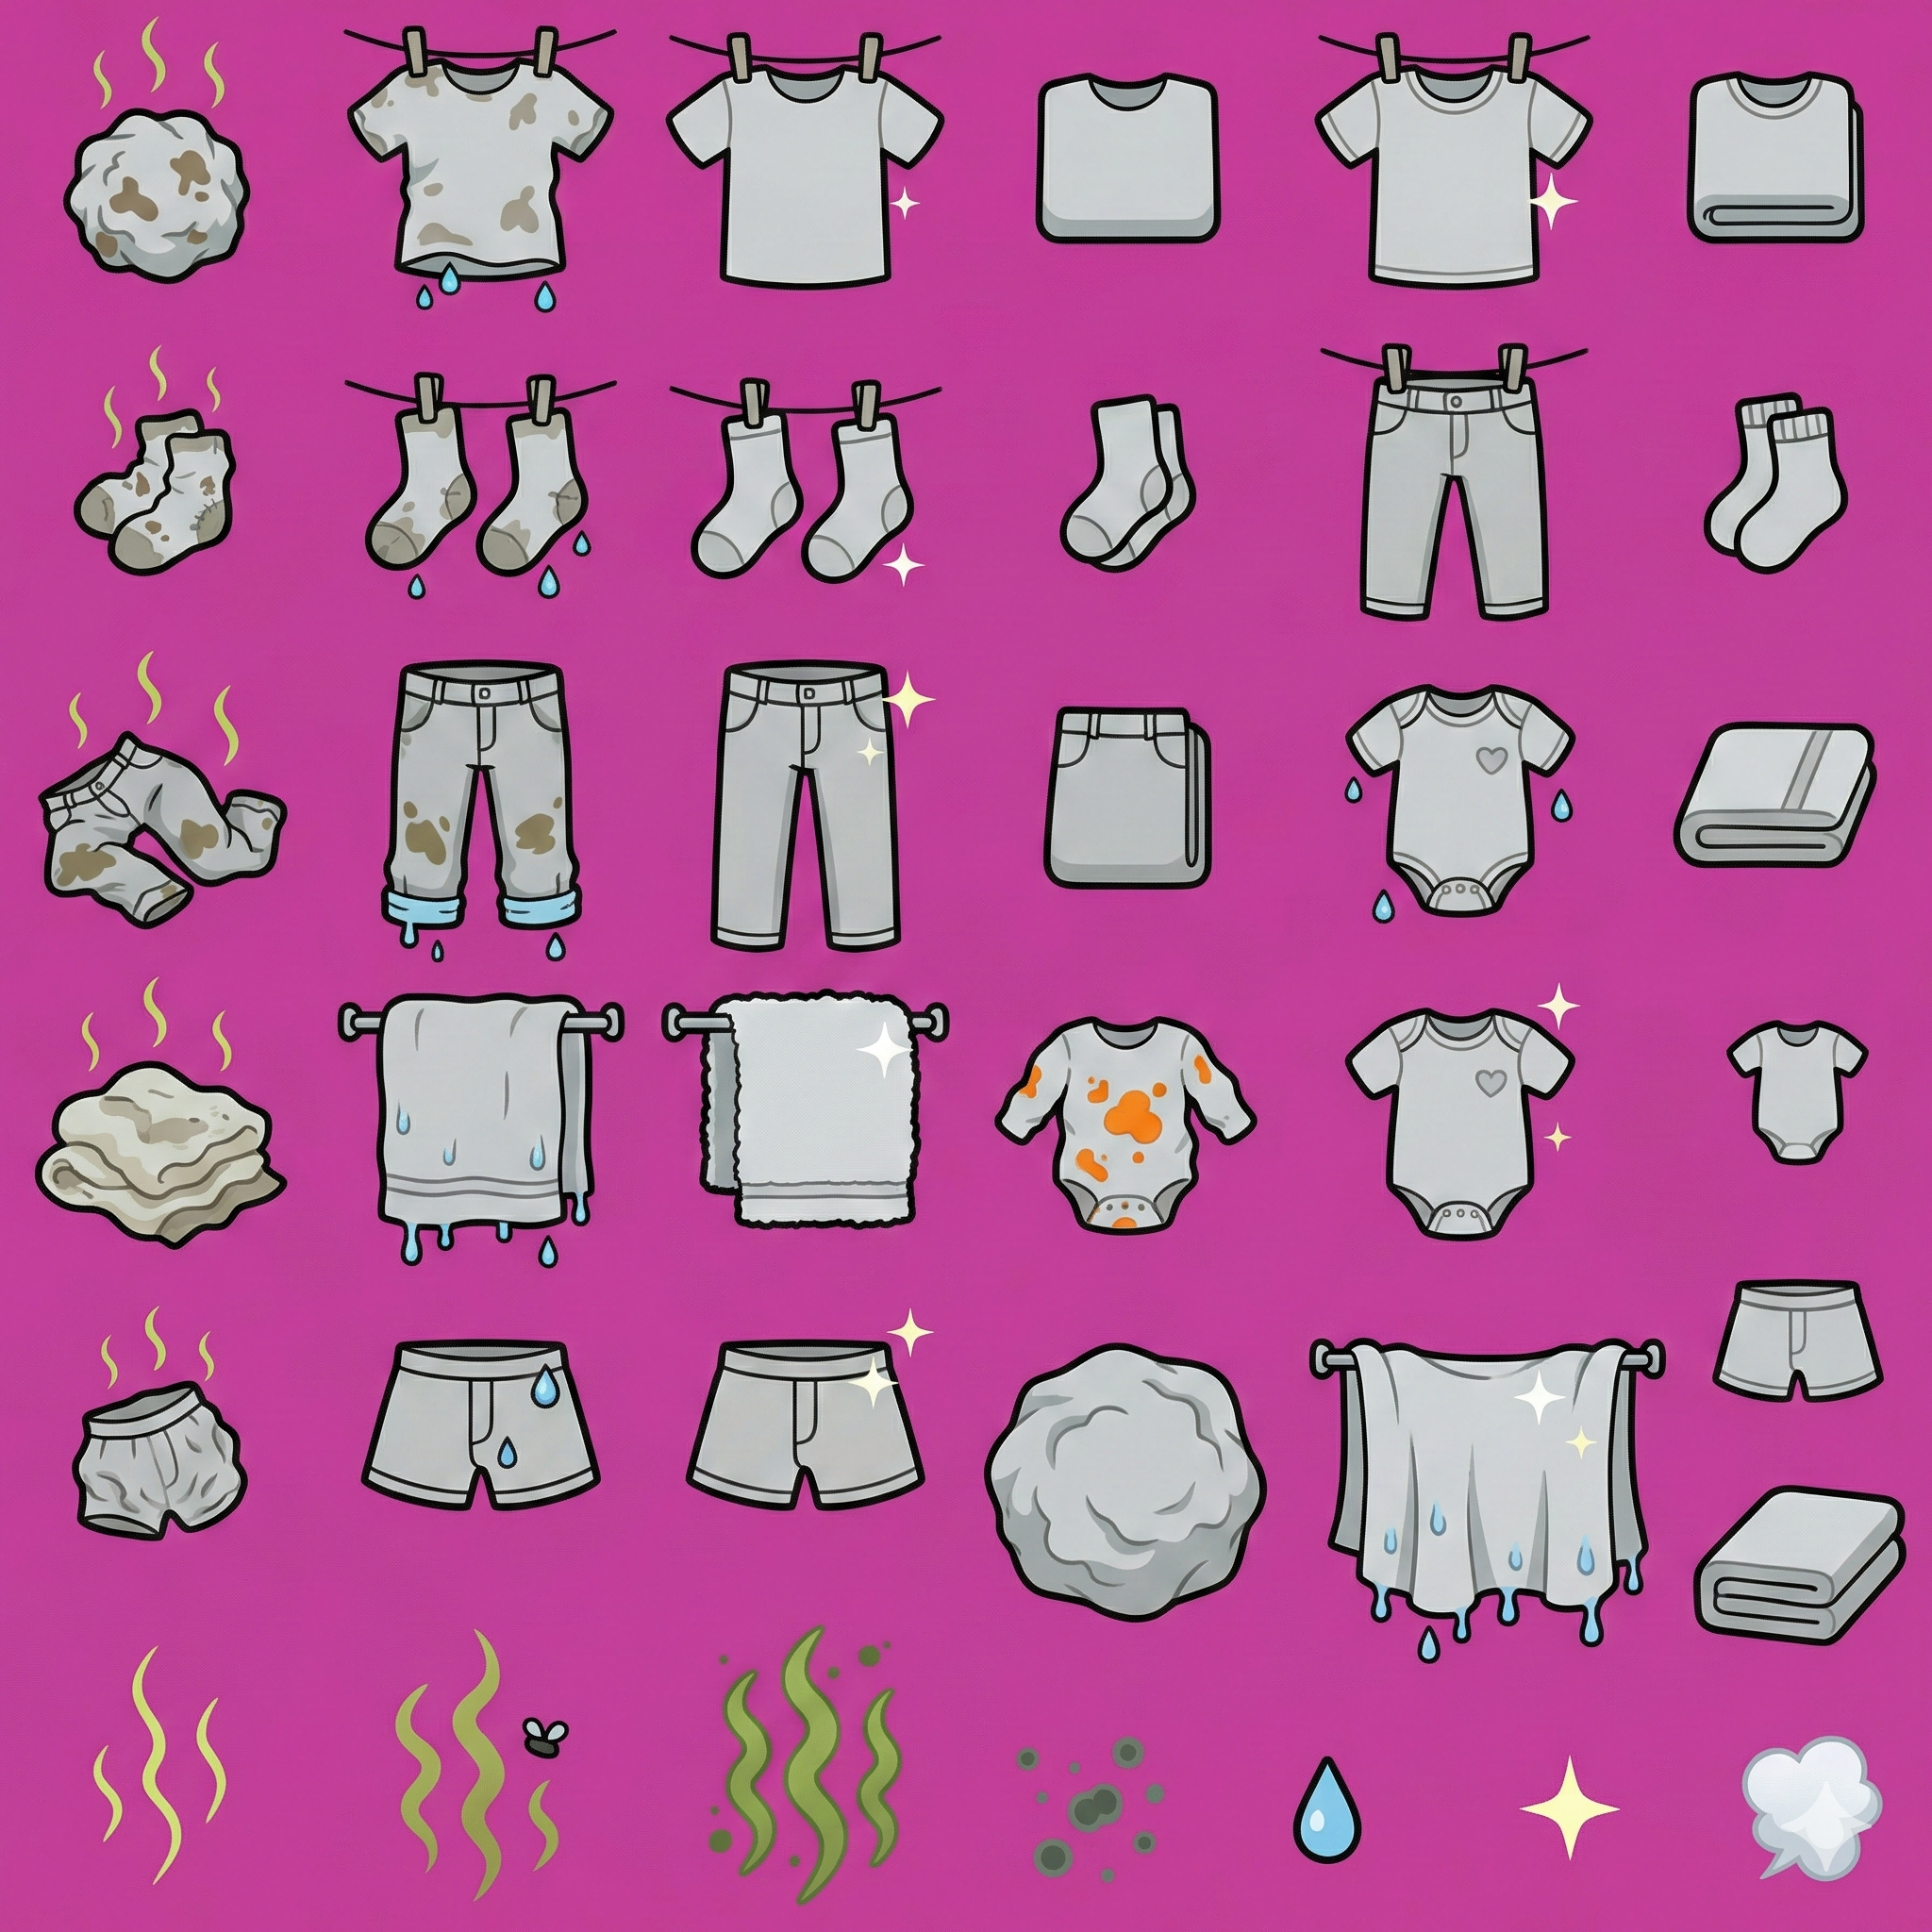
What happened: Two problems collided badly:
- The sprite outlines were black — the same brightness as the background. A simple threshold either ate the outlines (destroying the art) or left background remnants.
- Anti-aliasing baked background color into edge pixels. When the model renders a black-outlined sprite on a magenta background, the edge pixels blend to dark maroon/purple. These contaminated pixels survive any reasonable threshold and create a visible ugly fringe around every sprite.
We tried increasingly sophisticated fixes:
- Flood-fill from edges (using scipy
ndimage.label) to identify connected background vs. internal outlines. This correctly preserved outlines but the anti-aliased fringe remained — dark reddish halos around every sprite. - Alpha erosion (PIL
MinFilter) to eat the fringe. This ate too much, destroying fine details. - Alpha matting / de-premultiply to mathematically recover the original color from the blended edge pixels. Partially worked but still left visible artifacts because the original background color information is genuinely lost in the blending.
Lesson: You cannot cleanly remove a background that shares color space with your sprite content (black bg + black outlines = unsolvable). And anti-aliasing permanently bakes background color into edges — no amount of post-processing fully reverses it.
Attempt 3: Green Chroma Key + White Outline (The Solution)
What we did: Followed a proven approach from Phil Schmid’s transparent stickers workflow:
- Requested
#00FF00(pure green) background with emphatic prompt wording - Requested a 2-3px white outline around every sprite
- Used HSV-based color detection (not brightness) to identify and remove green pixels
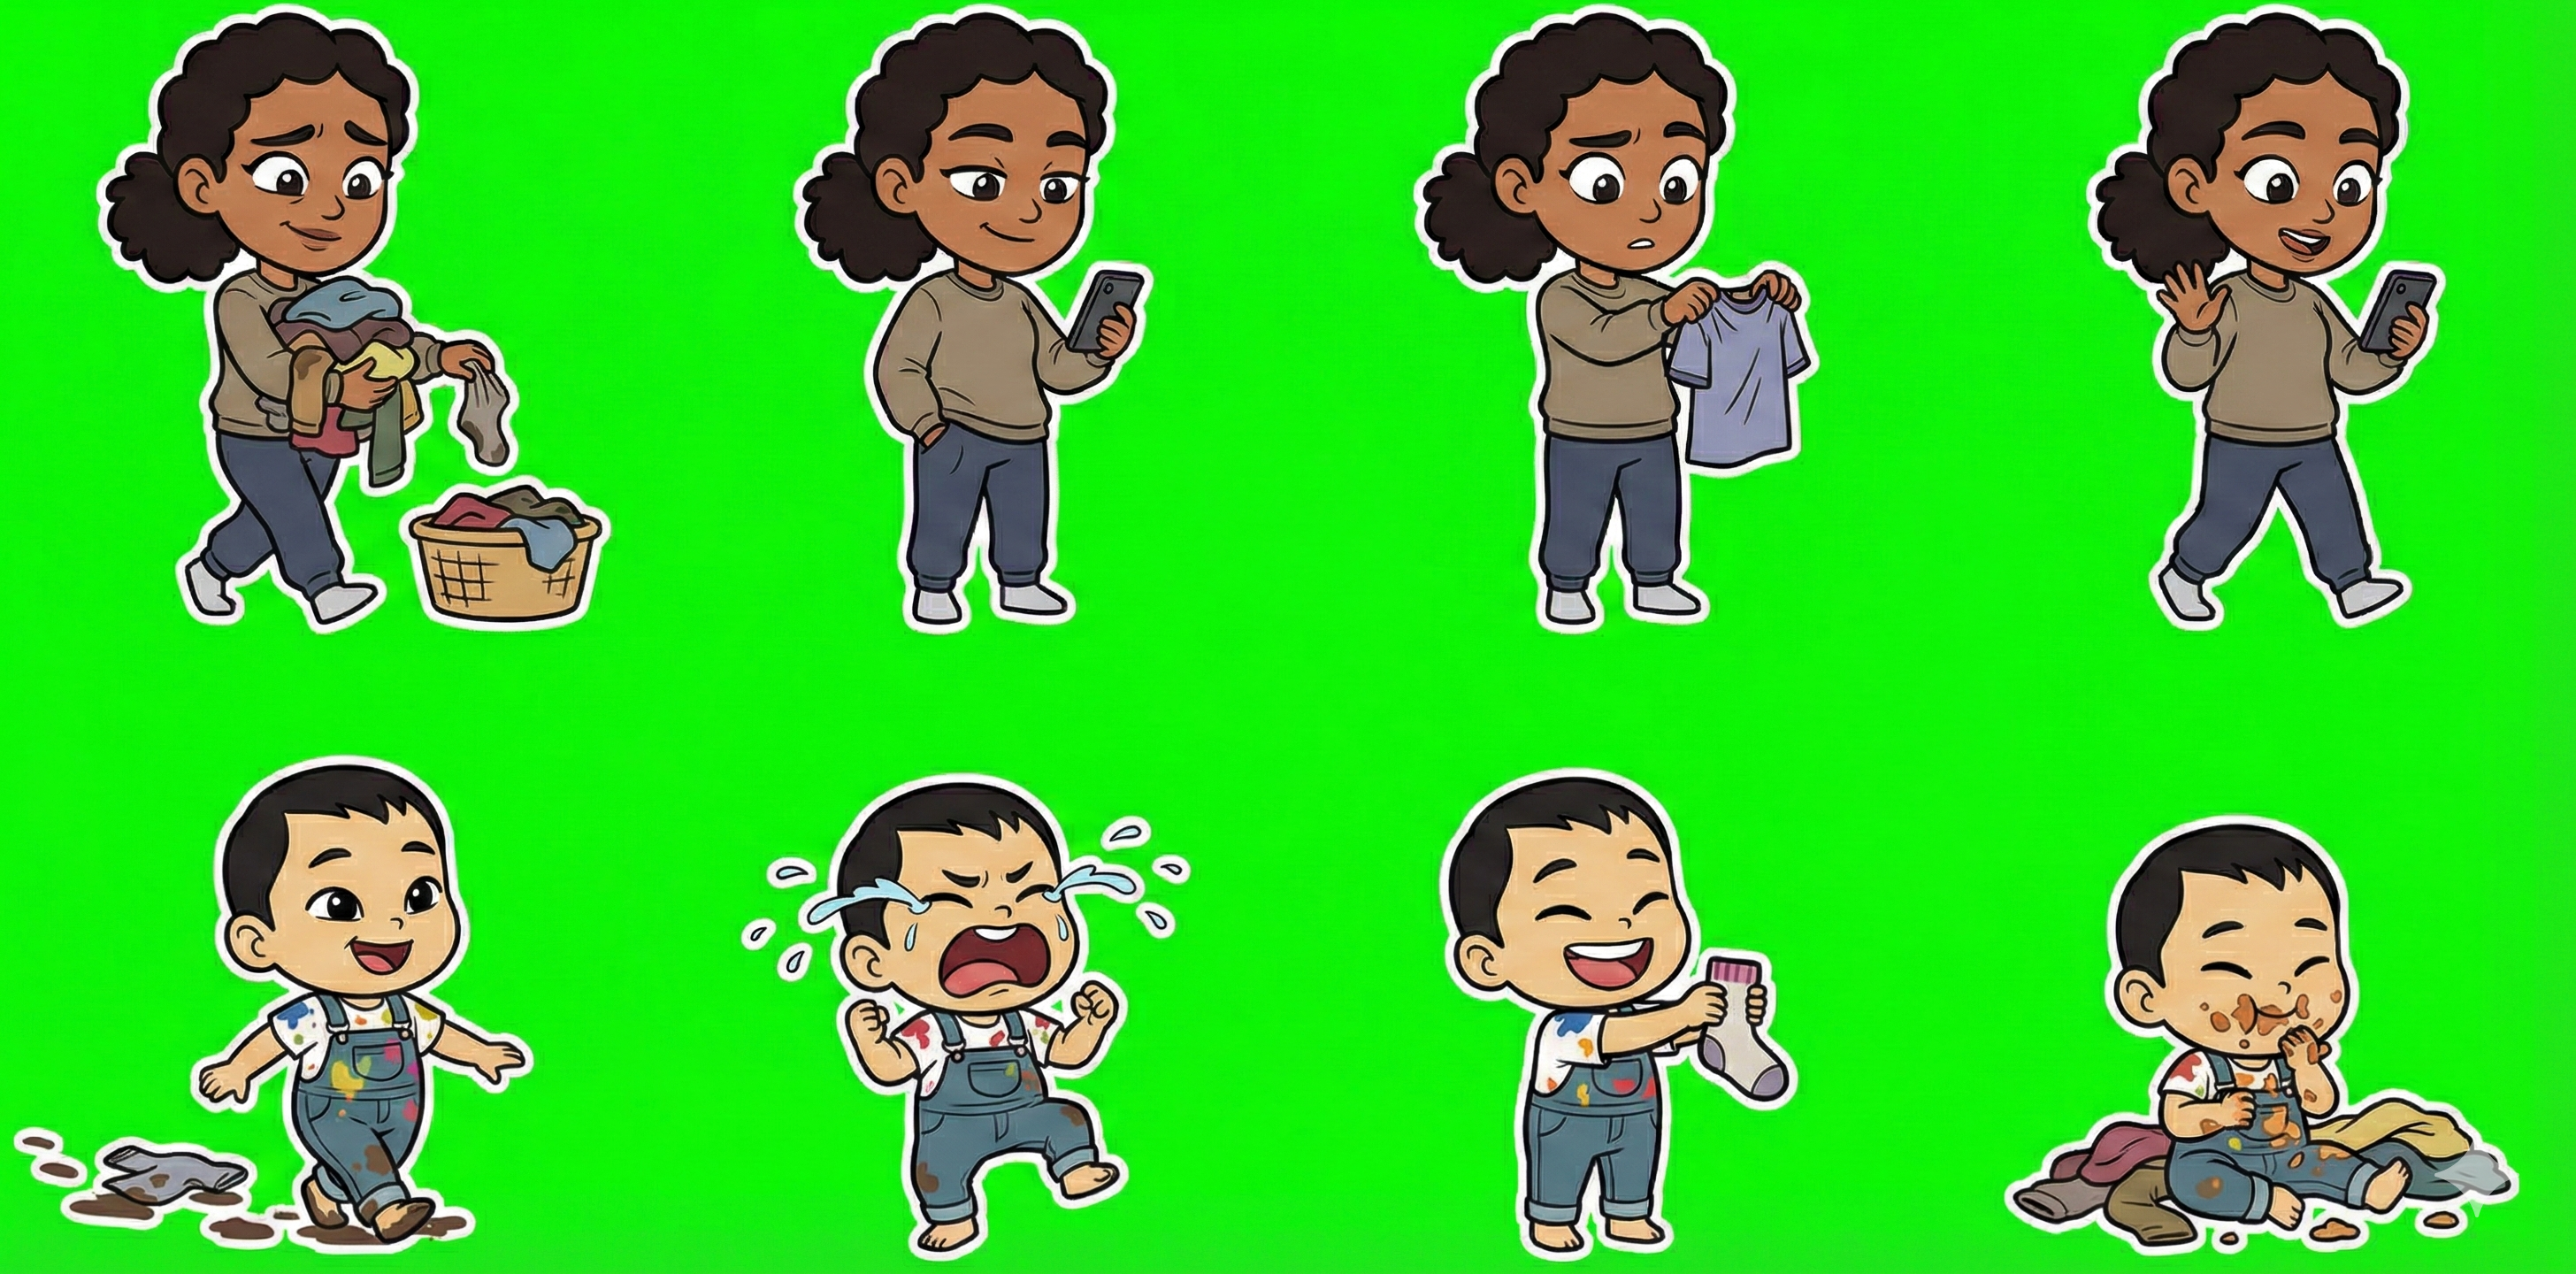
What happened: It worked cleanly. The combination of techniques solves most of the previous problems:
- Green has zero overlap with the sprite palette (greys, blacks, browns, skin tones, blues). HSV detection can target green precisely without touching anything else.
- The white outline acts as a buffer zone. Anti-aliasing now blends the sprite edge into white (which is fine) rather than into the background color. The green→white transition is sharp and clean.
- HSV thresholding is robust against slight color variation. Even when Nano Banana introduces minor noise or gradient in the green background (which it sometimes does), an HSV filter with reasonable tolerances (~22° hue, 0.3 saturation minimum) catches it all.
- BUT – often the green isn’t totally uniform. Sometimes you need more advanced threshold alpha channel generation using GIMP.
Lesson: Chroma keying is a solved problem in VFX for good reason. Use it.
The Complete Working Pipeline
Generation Prompt Template
The specific wording matters. Nano Banana responds well to emphatic capitalized instructions:
Create a [dimensions] pixel sprite sheet arranged in a [cols × rows] grid.[Describe each sprite position clearly, row by row]Style: 2D cartoon, bold black outlines 2-3 pixels wide, flat colors.CRITICAL BACKGROUND REQUIREMENT: The entire background must be solid flatchroma key green, EXACT hex #00FF00 (RGB 0, 255, 0) with NO gradients,NO noise, NO texture, NO shadows, NO lighting variation whatsoever.CRITICAL EDGE REQUIREMENT: Add a clean white outline/border 2-3 pixelswide around every sprite in every frame. This white border must fullyseparate the sprite from the green background with no gaps.Keep identical scale across all frames. Add 4px padding between frames.No text, no labels, no green anywhere in the sprites.
Key points:
- “CRITICAL” + capitals gets the model’s attention for non-negotiable requirements
- Specify the exact hex value — vague “green” produces inconsistent shades
- Explicitly ban gradients, noise, shadows, texture — the model will add them otherwise
- “No green anywhere in the sprites” prevents the model using green in clothing/skin
- The white outline instruction is the most important single line
Post-Processing (Python)
# HSV-based chroma key removal# 1. Convert to HSV# 2. Mark pixels as green if: hue within ±22° of 120°, saturation > 0.3, value > 0.3# 3. Set those pixels' alpha to 0# 4. Light edge softening (average with 4 neighbours)# 5. Zero out fully-transparent pixel color channels
The HSV approach is superior to RGB thresholding because it correctly handles both bright green (#00FF00) and darker greens that appear in shadows/noise.
Color Tinting
For clothing sprites that need to appear in multiple colors:
- Generate all sprites in neutral grey (#CCCCCC)
- Post-process: for each target color, apply a luminance-preserving tint
- Save pre-tinted variants in separate folders:
/sprites/coral/,/sprites/teal/, etc. - At runtime, just pick the correct folder — no shader/blend-mode needed
We tried runtime CSS tinting (mix-blend-mode: multiply) first. It looked washed-out at small sizes and added complexity. Pre-generating colored variants is more files but zero runtime cost and looks much better.
Grid Slicing: Uniform vs Content-Aware
Nano Banana does not space sprites in a perfectly uniform grid, even when you ask for one. Sprites vary in width based on their content (a folded t-shirt is narrower than hanging jeans).
- Uniform grid slicing (divide image width by column count) works for sheets where sprites are roughly the same size but will merge or clip sprites when sizes vary significantly.
- Content-aware slicing (detect connected non-transparent regions after chroma key removal) is more robust. Find columns of transparent pixels to identify boundaries between sprites.
We had a specific bug where uniform slicing merged two player character poses (idle + walk) into one frame because the player sheet had 6 sprites in one row and 5 in another. Content-aware detection found the correct 11 boundaries.
Recommendation: Always use content-aware detection. It’s a few more lines of code but saves debugging time.
Guidelines for Next Time
Prompt Design
- Split across multiple sheets. Don’t try to fit everything in one generation. 3-6 items per row, 2-3 rows per sheet maximum. Style consistency drops with complexity.
- One character per sheet (or two at most). Characters need consistent proportions across poses, which is easier for the model in smaller batches.
- Be extremely specific about each sprite position. “Row 1, left to right: dirty crumpled t-shirt with brown stains and stink lines; wet t-shirt hanging on clothesline with clothespins and water droplets; …” is better than “t-shirt in various states.”
- Include the green background and white outline instructions verbatim every time. Don’t assume the model remembers from a previous generation.
- Specify dimensions (e.g., 2048×1024) to get consistent aspect ratios you can plan around.
Post-Processing
- Always chroma key with HSV, not RGB or brightness. Tolerances of hue ±22°, saturation ≥ 0.3, value ≥ 0.3 work well for #00FF00.
- Use content-aware slicing over uniform grid division.
- Auto-trim each sprite after extraction (PIL
getbbox()+crop()). - Resize to your target max dimension (we used 128px) immediately. The source sprites are much larger than needed and the file size savings are significant (23MB → 7MB in our case).
- Pre-generate color variants rather than tinting at runtime if you need multiple colors.
What Nano Banana Is Good At
- Consistent cartoon style across a sheet
- Following specific descriptions for individual sprites
- Maintaining character identity across poses (mostly)
- The “sticker” aesthetic with bold outlines works very well
What Nano Banana Is Bad At
- True transparency (can’t do it)
- Perfectly uniform grids (sprites will vary in placement)
- Keeping exact proportions across separate generation calls (character might be slightly different between sheets)
- Avoiding green in sprites even when told not to (occasionally sneaks in a green element)
- Exact pixel dimensions per sprite (you’ll always need to trim and resize)
Time Estimates
For a set of ~48 clothing sprites (8 types × 6 states) plus 26 character sprites:
- Prompt writing: 30-60 minutes (worth investing time here)
- Generation: 5-10 minutes per sheet, expect 1-2 regenerations per sheet for quality
- Post-processing pipeline (once built): Under 1 minute for all sheets
- Manual QA and fixes: 30-60 minutes (checking edge quality, re-slicing misaligned sprites)
Total: roughly half a day for a full sprite set. The pipeline script is reusable, so subsequent sets are much faster.
