I’ve loved spaCy for a long time but I’ve only just got my head around a really useful design pattern that is worth describing. This post sets out how you can structure a text processing pipeline to take full advantage of the power of spaCy.
Pipelining
With spaCy 3.0 onwards, you have the setup below:

A chunk of text goes into the nlp object, which runs a series of different functions to output a Doc object based on the text.
In code this looks like this:
import spacy

text = "Hello World!"

nlp = spacy.load("en_core_web_trf")
doc = nlp(text)
Batches
For long documents, spaCy recommends processing the text in batches. This works well with other text generation or scraping tools. These often output a document (e.g., a Word document or web page) as a list of strings representing paragraphs or sections of content. In this case, you can use the nlp.pipe function to repeatedly apply above pipeline to each batch of text in turn:
import spacy

text_list = ["Paragraph 1 - fdfsadfsd", "Paragraph 2 - dgsdgsdfg", ...]

nlp = spacy.load("en_core_web_trf")
doc_generator = nlp.pipe(text_list)
docs = list(doc_generator)
Custom Pipeline Components
Often when processing text, the NLP analysis of spaCy is the first stage in some other processing. Maybe you want to extract names, link to a knowledge base, or compute some statistics. For this, it’s good to use custom components and custom attributes.
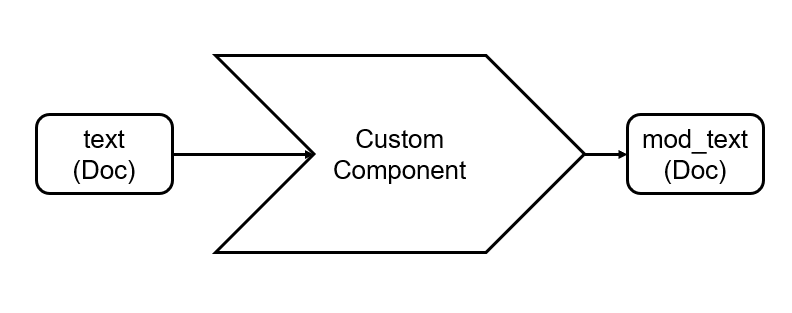
Custom components are described here. They are really just a function that is applied to a supplied Doc object and that returns a (potentially modified) Doc object. For example:
class CustomProcessor:
    def __init__(self, stuff):
         pass

    def __call__(self, doc):
        modified_doc = processing(doc)
        return modified_doc
This needs to be registered with spaCy, using something like this:
import spacy
from spacy.language import Language
from elsewhere import CustomProcessor

@Language.factory("custom_processor")
def create_custom_processor(nlp, name):
    return CustomProcessor(stuff)

nlp = spacy.load("en_core_web_trf")
nlp.add_pipe("custom_processor")
This component is then effectively added as part of the nlp pipeline we saw at the start. In this case, the processed Doc object that is output by the nlp pipeline also has our custom processing applied.
Custom components are great because you can use them to work on top of the accurate parsing and tagging that is performed by the default spaCy pipeline. For example, you can access named entities or the dependency tree.
Storing Extra Data
A core tenet of spaCy is that it doesn’t change the underlying text. For applications such as law, history, and literary analysis this makes a lot of sense. It does though make you think about how you process and annotate the text.
For example, the web and many domains annotate text using mark up languages such as HTML or XML. In these cases, the actual text content – the string at its heart – is altered to insert tags. So “Hello World” becomes “<h1>Hello World</h1>”. SpaCy isn’t designed to annotate like this.
Instead, you need to start thinking about the text at the Token and Doc levels.
A Doc object is a set of Token objects representing the tokenised text (roughly “words”). Much of your processing will involve a variation of:
for token in doc:
    do_something(token)
There is also a Span, which is best thought of as a view of a set of consecutive tokens.
Now back to our custom component. When we apply additional custom processing, we can use this to annotate our text via custom attributes at the Token, Span or Doc level. Custom attributes are described here. I find it useful to define them all in an __init__.py file together with my custom components:
# --- From before ---
import spacy
from spacy.language import Language
from elsewhere import CustomProcessor

@Language.factory("custom_processor")
def create_custom_processor(nlp, name):
    return CustomProcessor(stuff)

nlp = spacy.load("en_core_web_trf")
nlp.add_pipe("custom_processor")
# --- New stuff below ----

from spacy.tokens import Token, Doc

Token.set_extension(name="my_custom_token_field", default=False)
Doc.set_extension(name="my_custom_doc_field", default=[])
Sticking these all in a single “setup” file helps set out in one place the set of extensions that are being added together with the custom processing that is being applied. You can alternatively define these extensions as part of the __init__ method of you custom component but I found that I struggled to remember what fields I was adding (but this is possibly better to avoid forgetting to add a custom attribute that is later required in the custom processing).
Having defined our custom extensions, we can do some cool stuff in our custom processing component. We access the custom fields using an underscore with the syntax X._.attribute:
class CustomProcessor:
    def __init__(self, stuff):
         pass

    def __call__(self, doc):
        matching_tokens = list()
        for token in doc:
             if match_function(token):
                 token._.my_custom_token_field = True
                 matching_tokens.append(token)
        doc._.my_custom_doc_field = matching_tokens
        return doc
We can then access the custom attributes on our Doc and Token objects following the pipeline processing:
import nlp

text = "Hello World!"

doc = nlp(text)
print(doc._.my_custom_doc_field, [t._.my_custom_token_field for t in doc])
Serialisable
This way of working is good because it enables Doc objects with additional custom data to be serialised to disk (e.g., using the to_disk(path) method) or to bytes (e.g., using the to_bytes() method) for saving or caching (as long as your custom attributes are serialisable/pickle-able).
As these custom fields can be dictionaries in themselves you can have fairly advanced annotations.
With Doc objects you can also use the user_data dictionary to store data associated with the document. This duplicates the functionality of the custom attributes so I prefer custom attributes for consistency across the different document levels. Also the custom attributes allow setter and getter methods, which can help with data validation and processing.
Modular Processing
Pipelining multiple custom components as set out above helps with code readability.
You can define each custom component in a small separate .py file and can easily see what processing is being performed. Each custom component can also be tested and modified separately. For example, a test file may be generated for each component that contains one or more text examples with known or expected outputs and then the custom component may be applied to this text and checked with those outputs:
from custom_component_file import CustomComponent
# Use an nlp with all custom components disabled
from elsewhere import default_nlp

test_text = ["Here's a test string."]

ground_truth = [True, False, True, False]

def test_custom_component():
    test_doc = default_nlp(test_text)
    cc = CustomComponent()
    modified_doc = cc(test_doc)
    assert modified_doc._.my_custom_doc_field == ground_truth
You can then also keep different annotations or processing (semi) independent. This means different teams can work separately on each component and the code is cleanly delineated.
Macro Docs
If you are splitting a large and long set of text into a series of batches, then each batch has the applied nlp pipeline. Often, though, you also need to do some processing at the original document level, e.g. at the level of original web page or Word document.
For this I often create another higher level of document object that stores the docs relating to the individually processed batches:
from elsewhere import split_function, macro_process, processing_stuff, nlp

class MacroDoc:
    def __init__(self, big_text):
        text_list = split_function(big_text)
        # You can validate the text here
        self.docs = [doc for doc in nlp.pipe(text_list)]
        self.macro_property = macro_process(self.docs)

    # Shortcut that allows you to do: for doc in MacroDoc
    def __iter__(self):
        self.index = 0
        for doc in self.docs:
            yield doc

    # Shortcut to allow MacroDoc[i]
    def __getitem__(self, item):
        return self.docs[item]

    @property
    def generated_macro_property(self):
        return processing_stuff(self.docs)

    @property
    def text(self):
        return "\n".join([doc.text for doc in self])
This way you have in your document hierarchy MacroDoc > Doc > Span > Token.
For example, the MacroDoc object is a better way to store individual paragraphs of a large text, such as a book from the Gutenberg Project. At the MacroDoc level, you might want to store character names. At the Doc level, you might want to store which of the characters are present in each paragraph. At the Token level, you might want to link between a detected named entity and the global list of character names. Doing this you can generate an Amazon X-Ray style functionality with not too much work.
At the MacroDoc level you can also do cool stuff like link to existing knowledge bases. For example, if your book contains real people or places you could link to the Wikipedia entry for those items.
